Sunday, May 29, 2011

First railing in place! Getting ready for the EcoSolar home tour!

Dan and Jeff from River City Metalworks came by on Saturday to start installing the metal railings. The frames have been powercoated and the mesh inserted and they look awesome!

Unfortunately, we had some technical difficulties. It seems that one of the panels was made too large for the opening by 1/4" and we entirely forgot to have one of the straight panels made.  Then one of the mudders stepped on another panel... So, Dan and Jeff have their work cut out for them this week to try and get them all finished. Fingers crossed we'll have them ready for the EcoSolar home tour!

Hmmm. someone likes the insulated roof.


When I was on the roof deck, I noticed a couple birds fly out of a place under the soffit and overhang. I'm not sure what kind of bird it was. And then I noticed some bits of insulation on the roof deck.  And then I noticed a larger hole on the end of the polyiso insulation board. I climbed a ladder to look for a nest, which was Serena's thought, but didn't see anything. I'll need to check with a flashlight later. I wonder if we can charge rent...

taping. mudding. mess making.

stilt walker!
Taping has been going on strong for a good two-almost three weeks now. And it's messy. Black epoxy floors are not exactly black anymore.  But I guess it's an art you can't control.

Drywall mud and dust has found its way into all the pits, cracks and holes in the epoxy floor.  I sure hope it isn't gonna' be a pain to wash out. At least it shows me where we need to fill the floor with more epoxy!

Thursday, May 19, 2011

Yay! Our Heliene Modules are here in town!


Clifton from Great Canadian Solar sent me this exciting photo of our 300 Watt Heliene solar modules! Somewhere in Edmonton [location is secret!] there is a crate of 16 of these lovely bits of mono-crystalline solar cells, aluminium and glass with our names on it!  Can't wait to see 'em up on the house! [But first, I need to get some siding up! Anyone know a good cement-board installer?]

And it comes just as we finished installing a PV sunshade at our building at work!  Check it out here!

Saturday, May 14, 2011

The first interior door installed! Yay!

Old doors have square hinges, so they need
to be hand-chiseled.
My father-in-law, Dwain, came to town and we spent the day putting up one of the doors I salvaged from a house that was demolished last summer. I posted about the truck full of doors here! I want to re-use 19 doors in the basement suite for bedroom doors and closet doors. I was hoping it would be relatively easy. Ummm, not so. 

First, we met to pick up the jamb & stop material at the local, very busy-on-Saturday building supply store.  We unloaded the material. We moved the salvage doors from the garage and proceeded to bring them into the basement.  Then we measured the rough openings.  Doh! The framer didn't follow my drawings that showed all the sizes I wanted the rough openings to be. And the drywaller didn't realize that the closets would have doors- so he put drywall over the rough openings, thinking we would do typical bifold closets. And the salvage doors are all odd dimensions like 31.75" Or 29.25" Not 31.0" or 24.0" or anything regular for quickly hanging the doors on the jambs that are sized to the nearest inch.


Lovely, dainty litte Yale door knobs and
hardware.
 So, we finished one door. And cut to size 2 other doors.  And I spent a good while learning how to use a chisel properly [It's been a while since Industrial Arts class, way back in grade 9]. And this is why people don't bother to salvage/re-use as much as we should. It's a whole lot of work! But the results look great. And it's a great way to spend the day working.

Thanks also to Tyler to has carefully stored some doors for me as well as the hardware, which I picked up from him last night! Don't worry, I'll pay you back in other spare building materials!


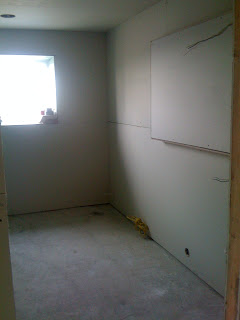
The first interior door is hung! Yay!

Bloody wind.

Our neighbour Mary sent me this photo. I was aghast.

The nasty wind on Thursday really wreaked some havoc at the Beverly Heights house. Our vigilant neighbour Mary sent me a photo to the left from her house. I was at work at the time- and couldn't get out of meetings. I tried to get our taper/mudder on site to tack back the tyvek, but he wasn't sure what to do, and how to climb a very tall ladder in high winds We ending up taking the un-attached part of tyvek down.

Lesson learned: only put up the air barrier when you know you will not encounter a wind storm, and do it shortly before the exterior cladding goes on!

Monday, May 9, 2011

We have epoxy floors! And some are black!

Rough spots I want to fill in with another
layer of epoxy.

The first spot of black being sprayed down! 
Right on the heals of drywalling, we had some help getting the floor epoxied on the basement, main and 2nd floor!  They are really shiny! And the main and 2nd floor are black!  We left the basement "natural" concrete, as it has an interesting "greenish/brown" colour to the aggregate and cement.

We still have to put down another [3rd] layer of epoxy, as I can still see some pits and rough spots that really need to fill in.

Looks like a space to live in!
Thanks to some elbow grease from Rita, Alex and Tyler!

...And drywall is done! On to taping & mudding!

It sure didn't take long to drywall- a couple weeks and voila~ a house with rooms!

Ground floor hallway.
Back door in the distance!
Main floor washroom.

Ground floor stair landing. Now the basement suite is
completely separate!